Chapter 3: Inside the Interactive Slicer — Dials, Masts & Meetpoints
In Chapter 2, you used the Interactive Slicer to cut a Round Brilliant. Now let’s open the hood on every dial, button, and mode inside the Slicer so you can design or modify any gemstone—from simple step cuts to intricate asymmetric fantasy cuts—without touching the keyboard.
[!IMPORTANT] Always Slice in
PaletteorMonoView Mode The Slicer’s translucent 3D cutting-plane disc, vertex depth-snap guides, and clickable golden meetpoint diamonds (♦) are displayed inPaletteandMonomodes. When the viewport is set toRaytraced,ASET, orBDPT, ProFacet shows a yellow reminder banner at the bottom of the Slicer (Interactive slicer only works in Monochrome or Palette mode).
1. The Top Precision Dial Deck
The top bar of the Slicer is your digital index head. It controls the gear tooth count and how your active cut repeats around the 360° dop axis:

A. The Gear Hub (96)
- Click the machined Gear Wheel on the far left to cycle through standard faceting machine gears:
32,64,72,80,96(default), and120. - When you switch gears, ProFacet updates the tooth ticks on the
IDXandMIRdrums and recalculates the valid divisors on theSYMdrum automatically.
B. Dial Mode vs. List Mode
DialMode (Default): Uses the three horizontal cylindrical Vernier drums (IDX,SYM,MIR) to generate symmetric tooth loops.ListMode (Explicit Index List): Click theDialbutton to switch toListmode whenever you want to cut an asymmetric stone or an arbitrary subset of teeth (such as[0, 24, 48]without72). InListmode, you can type tooth numbers directly or click individual teeth around a visual gear ring.?Button (Symmetry Assistant): Opens the Symmetry Assistant to reverse-engineerIDX,SYM, andMIRfrom any printed tooth sequence.
C. The Three Vernier Drum Dials (IDX, SYM, MIR)
You can click and drag any drum horizontally, scroll your mouse wheel while hovering over a drum, or click any visible number on the drum scale to snap to it:
| Drum | Full Name | Range | How It Shapes the Tier |
|---|---|---|---|
IDX | Base Index | 0 to Gear - 1 | Selects the reference tooth on the gear (0 = tooth 96 at top dead center). For a mirrored tier (MIR > 0), IDX sits at the symmetry axis halfway between the mirrored pair. |
SYM | Symmetry Fold | Divisors of Gear (×1, ×2, ×3, ×4, ×6, ×8, ×12, ×16…) | Repeats the reference cut N times around the circle in equal angular steps of Gear / N teeth. |
MIR | Mirror Delta (±M) | OFF, ±1, ±2 … ±(Gear/2 - 1) | The ± delta index (written as m M in FSL xN m M) that splits each symmetry axis stop IDX into two mirrored cuts at IDX - M and IDX + M. For example, on a 96 gear, IDX = 0, SYM = ×4, MIR = ±6 (0 @ ... x4 m 6) cuts 8 facets at 90, 06, 18, 30, 42, 54, 66, 78. |
2. The Two-Column Slicer Workbench
Beneath the Dial Deck, the Slicer is split into the Tiers Table & Action Bar on the left and the Vertical Angle & Depth Masts on the right:
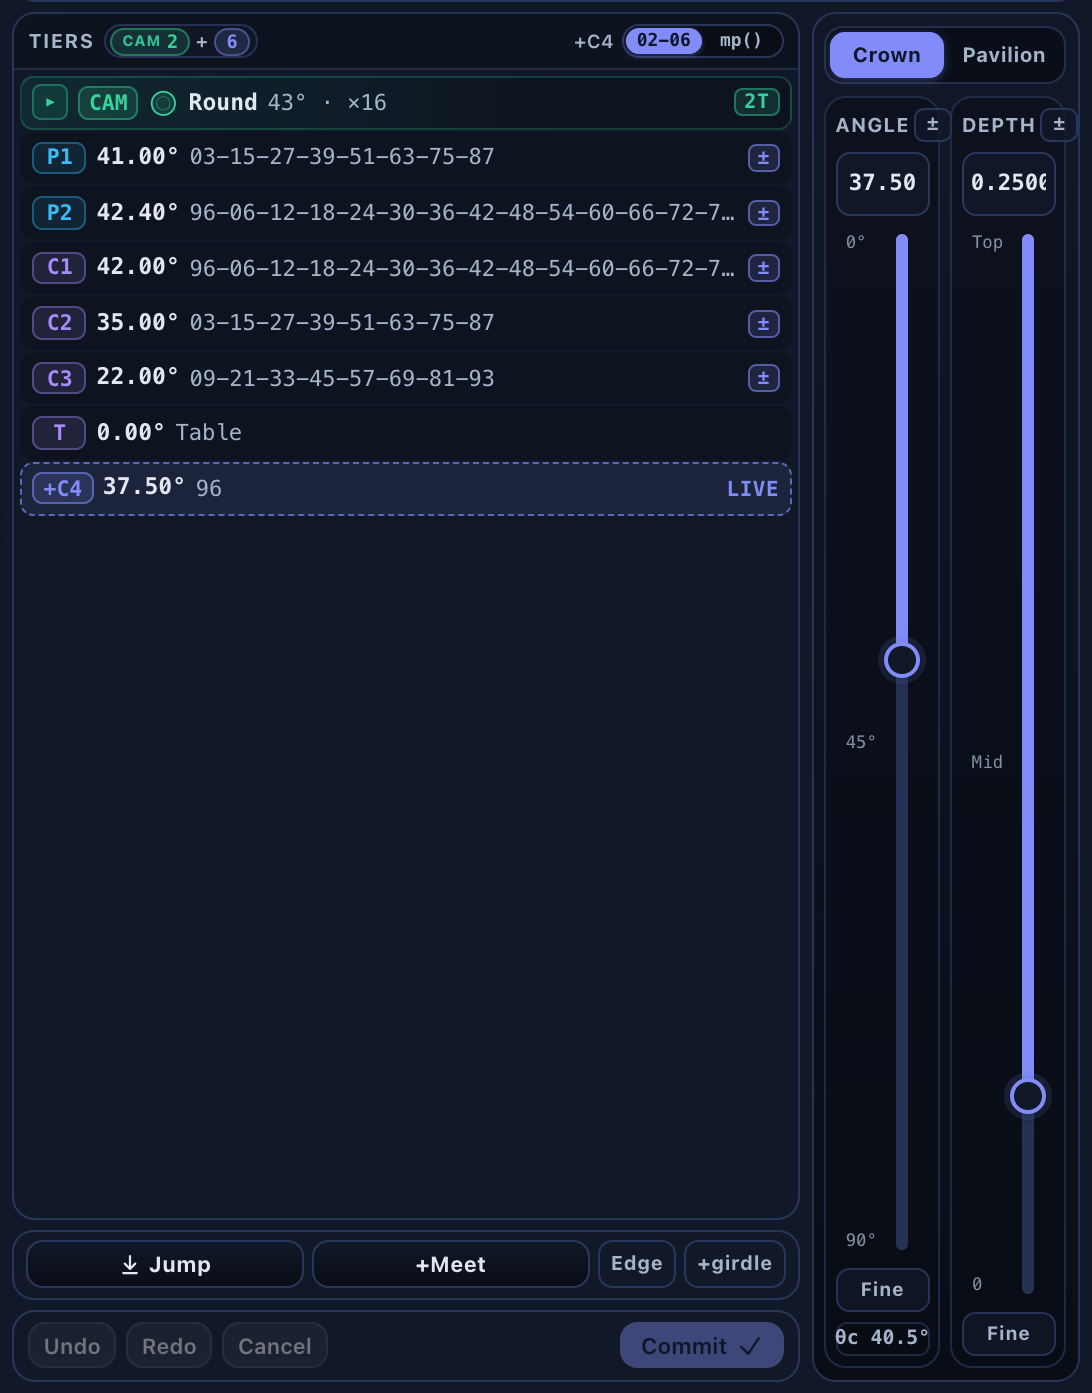
Left Column: The Tiers Table
- Header Bar (
TIERS&02-06 | mp()Switch):CAM 2 + 6Badge: Shows the count of CAM preform tiers (2) plus permanent faceted tiers (6).02-06vs.mp()Toggle:02-06(Cutter View): Displays the exact sequence of gear teeth (96-12-24-36-48-60-72-84) you dial at the machine.mp()(Formula View): Displays the symbolic FSL depth/meetpoint target (: gp() + girdle x8 m 3) so you can verify how each tier is anchored geometrically.
- The Green
CAMRow:- Summarizes your stone's starting outline (
Round 43° · ×16,RectTr 1.4× · 43° · tr 0.28, etc.). - Click the green
CAMrow at any time to open the CAM Preform Studio and change the stone's shape, aspect ratio, or corner truncation!
- Summarizes your stone's starting outline (
- In-Place Editing of Existing Tiers (
P1,P2,C1…):- Click any committed tier row in the table to edit it in-place! The row highlights, and its angle, depth, meetpoints, and drum dials load into the Slicer controls. Adjust the angle or meetpoint and click
Commit ✓to update that tier (and automatically recompute all downstream tiers that depend on it!), or clickCancelto discard your changes. - The
±Optimization Toggle: Click the±button on the right edge of any tier row to mark (or unmark) that tier's angle with a+/-optimization range for the GPU Optimizer.
- Click any committed tier row in the table to edit it in-place! The row highlights, and its angle, depth, meetpoints, and drum dials load into the Slicer controls. Adjust the angle or meetpoint and click
- The Dashed
+LIVERow:- The bottom dashed row (
+C4 37.50° 96 LIVE) shows the uncommitted tier you are currently previewing on the 3D stone.
- The bottom dashed row (
3. How ↓ Jump, +Meet, and +girdle Work Together
At the bottom of the Tiers table sit four geometry buttons that replace manual depth guesswork:
| Button | What It Does Geometrically |
|---|---|
↓ Jump | Starts from outside the stone and slides your cutting plane inward along its normal vector until it touches the next distinct group of vertices on the 3D mesh. Click ↓ Jump repeatedly to step deeper from one vertex ring to the next! |
+Meet | Converts the current cutting depth into a symbolic meetpoint expression (cp(), gp(), or mp(TierA, TierB)). You can also click any golden diamond marker (♦) directly on the 3D stone to add or remove a meetpoint target! |
Edge | Switches to Edgepoint (ep) Mode (detailed below) for placing a cut at a fractional ratio (0.00–1.00) along an existing facet ridge. |
+girdle | Appends + girdle to a Crown tier's depth target so the first Crown tier starts above the Pavilion girdle by the stone's girdle thickness (0.03 by default). |
4. Edgepoint (Edge) Mode — Cutting Fractionally Along a Ridge
What if you are designing a step cut, a portrait stone, or a fantasy cut where a new tier does not meet an existing corner, but instead needs to slice 40% or 50% of the way along an existing ridge between two facets?
Clicking Edge opens the Edgepoint (ep) Panel:
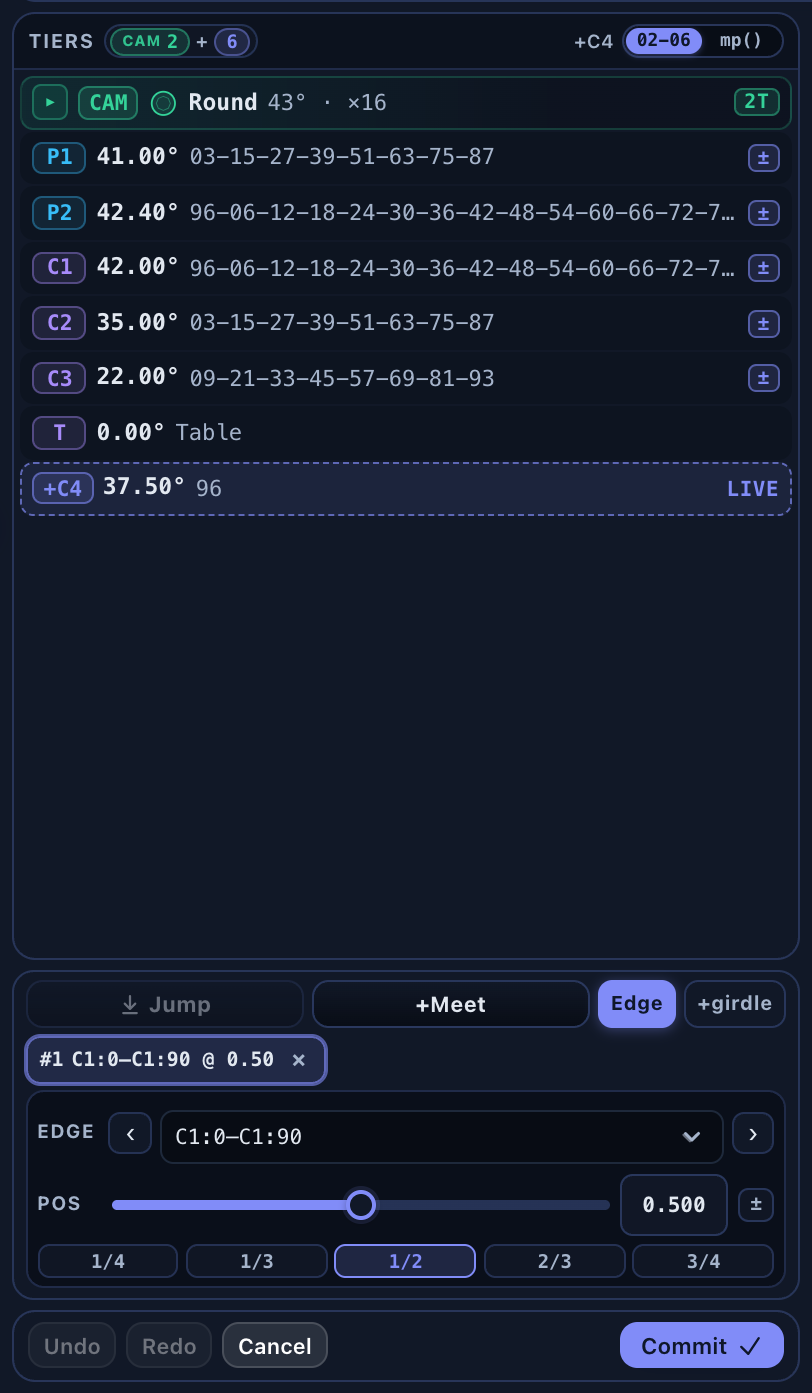
- Click
Edgein the bottom action bar. - Select the two adjacent facets (
Facet 1andFacet 2) that share the ridge—or click the ridge directly in the 3D viewport. - Drag the
Ratioslider (0.00to1.00) to position the cut anywhere along that ridge (0.50= exact midpoint). - Click
Commit ✓—ProFacet writes a parametricep(edge(Facet1, Facet2), ratio)expression into your script that stays locked to that proportional position even if the stone is resized or optimized!
5. Right Column: Crown | Pavilion & Vertical ANGLE / DEPTH Masts
Crown | PavilionSwitch: Determines whether0°–90°angles cut from above (Crown,+Z) or from below (Pavilion,-Z).ANGLEMast (0.00°–90.00°):- Drag the vertical slider thumb, type an exact number into the top readout box, or click
Fineat the bottom of the mast to open a0.01°precision jog wheel. θcCritical Angle Pill: Displaysarcsin(1 / RI)in degrees (θc 34.6°for Sapphire,θc 40.5°for Quartz) right at the base of theANGLEmast.
- Drag the vertical slider thumb, type an exact number into the top readout box, or click
DEPTHMast (Top–0):- Drag the vertical depth thumb whenever you want to position a cut freely in space (Style 1: Angle + Depth) or preview how deep a cut will go before clicking
↓ Jumpor+Meet.
- Drag the vertical depth thumb whenever you want to position a cut freely in space (Style 1: Angle + Depth) or preview how deep a cut will go before clicking
Next, let’s explore how to change the outer shape of your stone into Ovals, Emeralds, Pears, Cushions, Hearts, and Shields in Chapter 4: Shaping the Outline — The CAM Preform Studio.