Chapter 2: Guided Tutorial — Cut Your First Round Brilliant
In this chapter, you will cut a complete Standard Round Brilliant Quartz Gemstone (RI = 1.54, 96 index gear) using only your mouse in the Interactive Slicer. Follow along step by step directly in ProFacet Studio!
Step 1: Click New to Mount a Fresh Round Preform
- In the top toolbar of the right-hand pane, click
New. - ProFacet creates a clean 16-sided round preform (
Round(43, 16)) on a96-tooth gear and automatically sets the 3D Viewport toPalettemode so you can see individual facets and meetpoint markers clearly. - Click the
⌄(Show display options) button in the top-left of the 3D viewport and turn onFacet Infoso every facet displays itsTier:Indexlabel. - At the bottom-left of the 3D viewport, click
Pavilion(Flip View | Crown | Profile | Pavilion) so you are looking straight at the bottom of the blank.
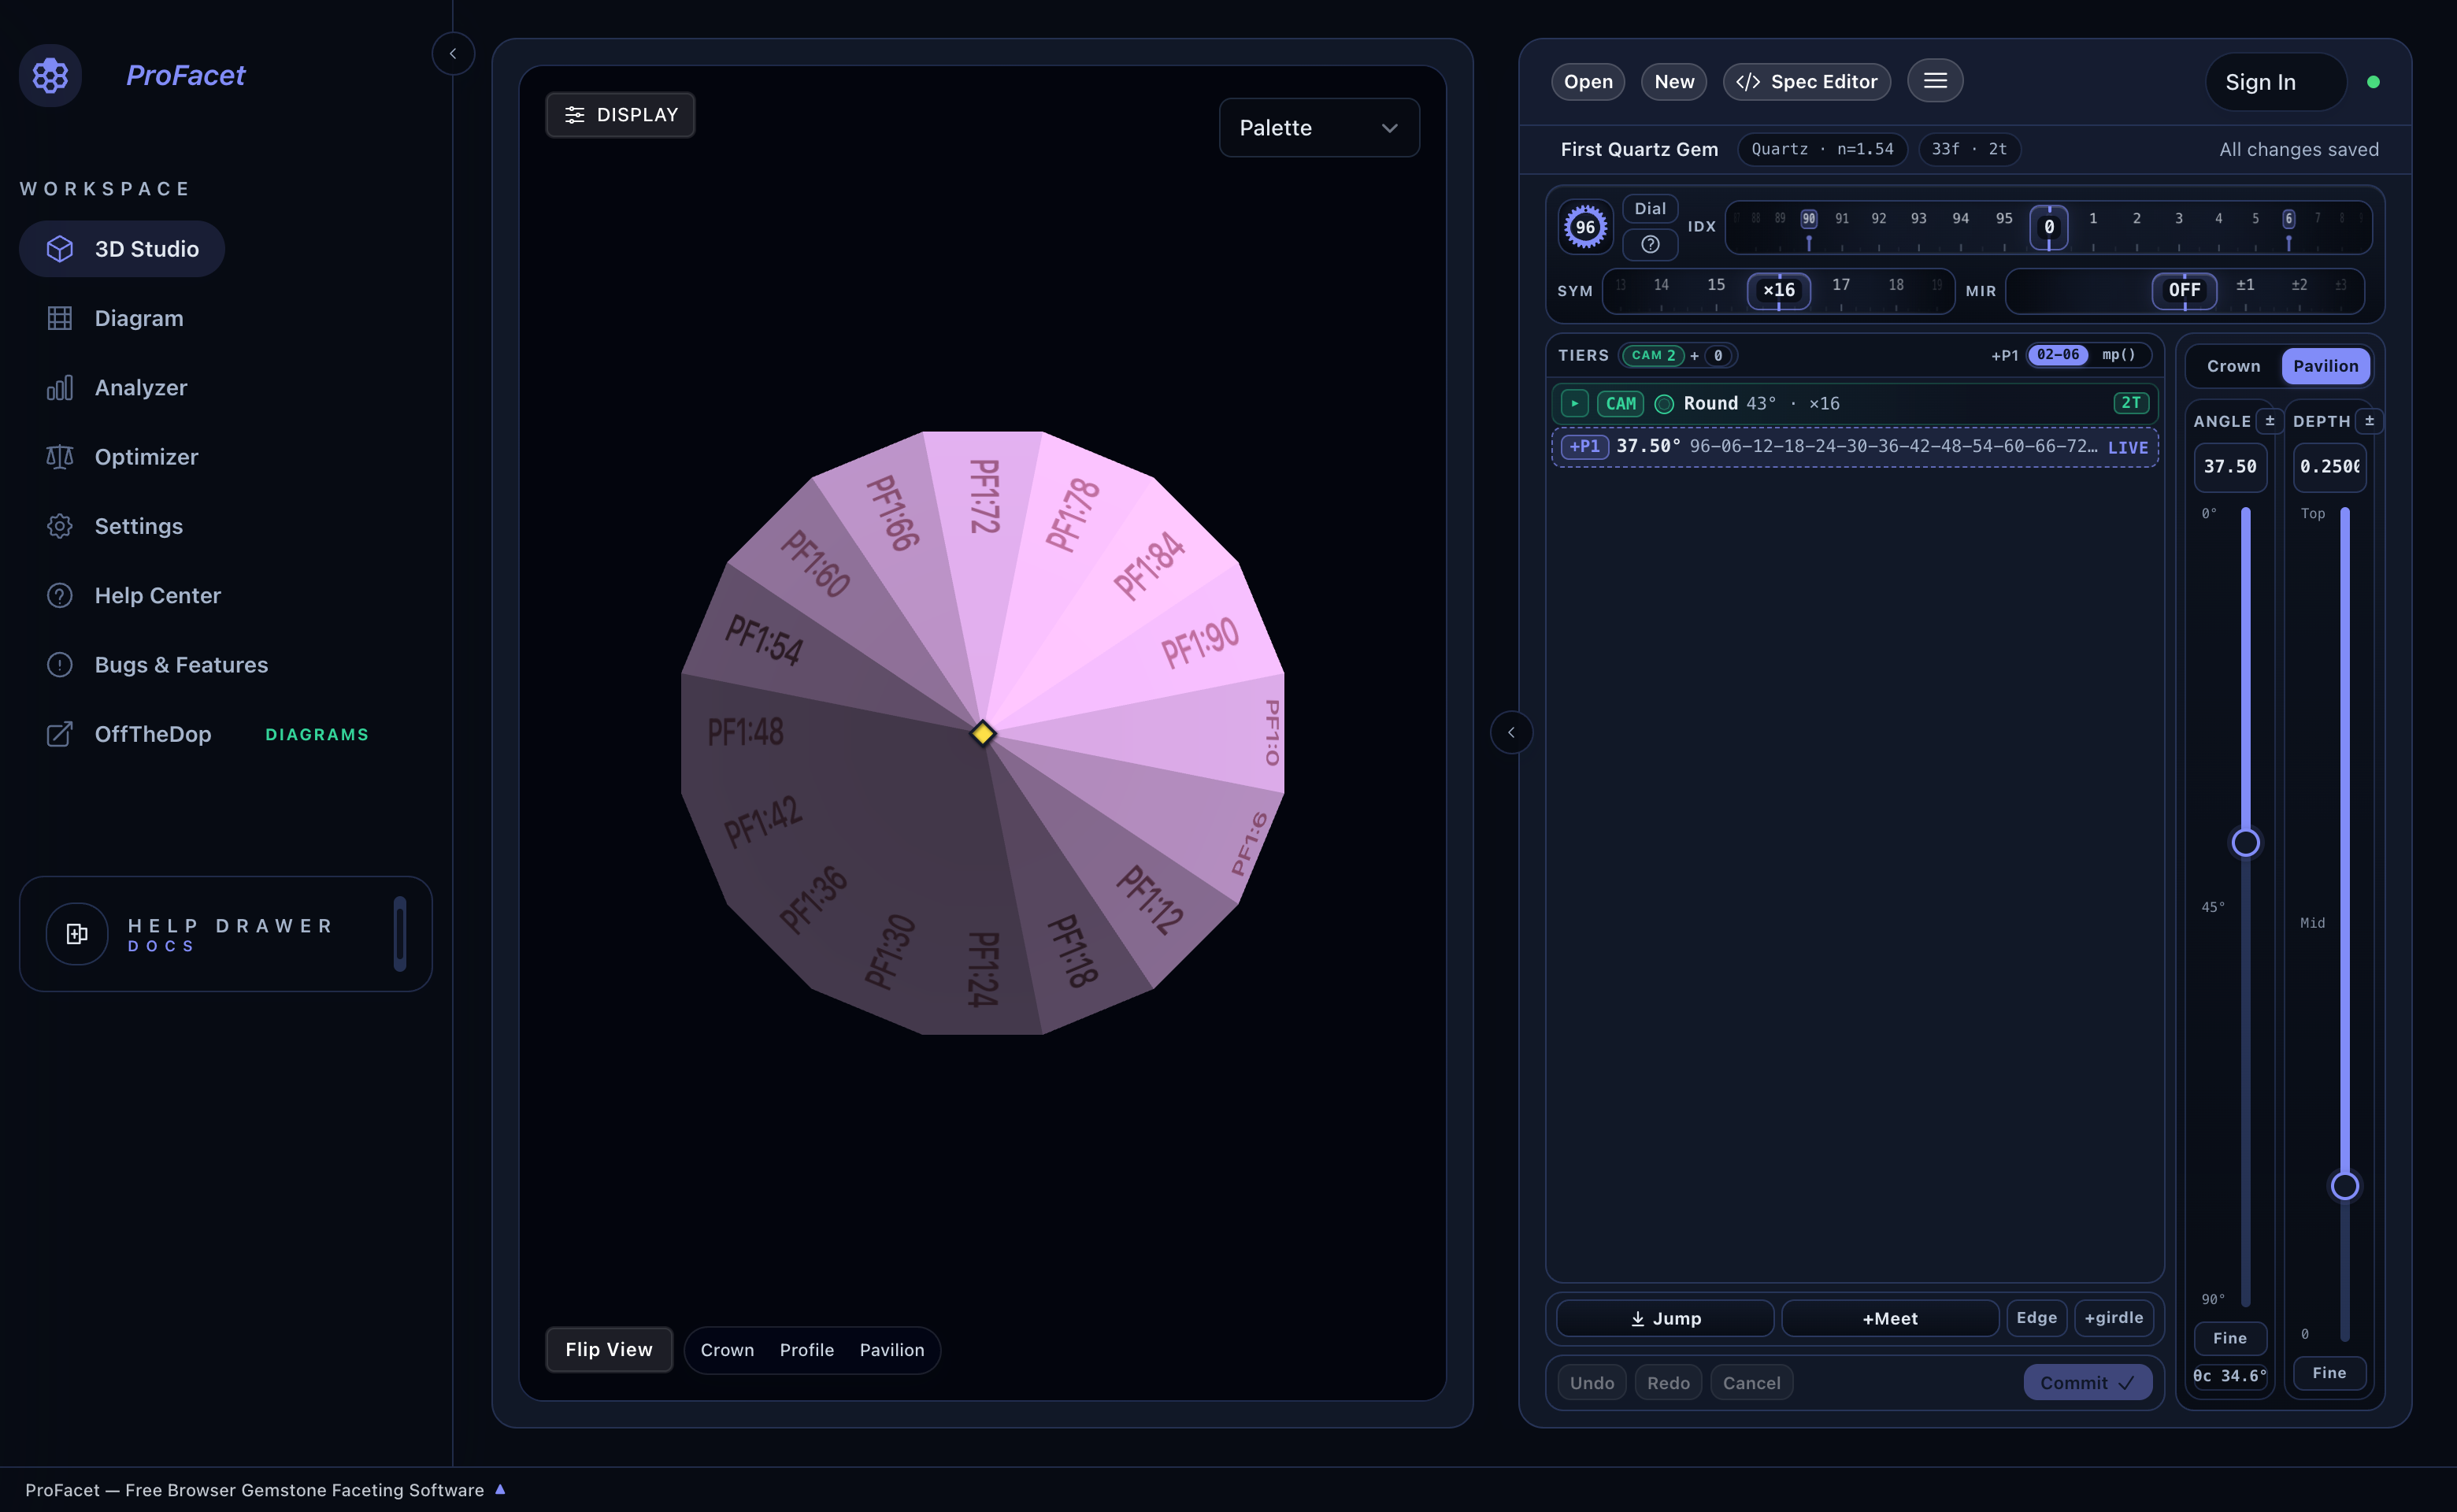
[!NOTE] What Is That Green
CAM · Round 43° · ×16Row? Instead of making you manually cut 16 temporary centerpoint facets and 16 vertical90°girdle facets just to get a round cylinder,Round(43, 16)does that preform work in a single step! Notice the golden diamond (♦) in the center of the Pavilion view—that is the centerpoint (cp()) where our Pavilion Mains will meet.
Step 2: Cut the 8 Pavilion Mains (P1) Anchored at the Girdle (gp())
First, we will slice 8 kite-shaped main pavilion facets at 41.00° (safely above Quartz's 40.5° critical angle) starting from the 8 outer girdle corners (gp()) and meeting at a brand-new central culet:
- Above the vertical masts on the right, make sure
Pavilionis active. - In the top Precision Dial Deck, set the three horizontal drums:
IDX:3(aligns with the girdle corners ofRound(43, 16)at03-15-27-39-51-63-75-87)SYM:×8(cuts 8 evenly spaced facets around the 96-tooth gear)MIR:OFF
- In the
ANGLEbox on the right mast, enter41.00. - Click
↓ Jumpin the action bar below the Tiers table so the cutting plane slides inward to touch the outer girdle corners (gp()), then click+Meetto lock it togp().- Why anchor
P1atgp()instead ofcp()? BecauseRound(43, 16)already cut a43.00°preform cone to the old centerpoint (cp()), a shallower41.00°cone passing through that samecp()would float outside the stone in thin air! AnchoringP1at the outer girdle corners (gp()) slices deeper into the pavilion from the rim, carving 8 kite-shaped Pavilion Mains that meet at a new central culet while leaving 16 temporaryPF1triangles around the rim.
- Why anchor
- Click
Commit ✓.
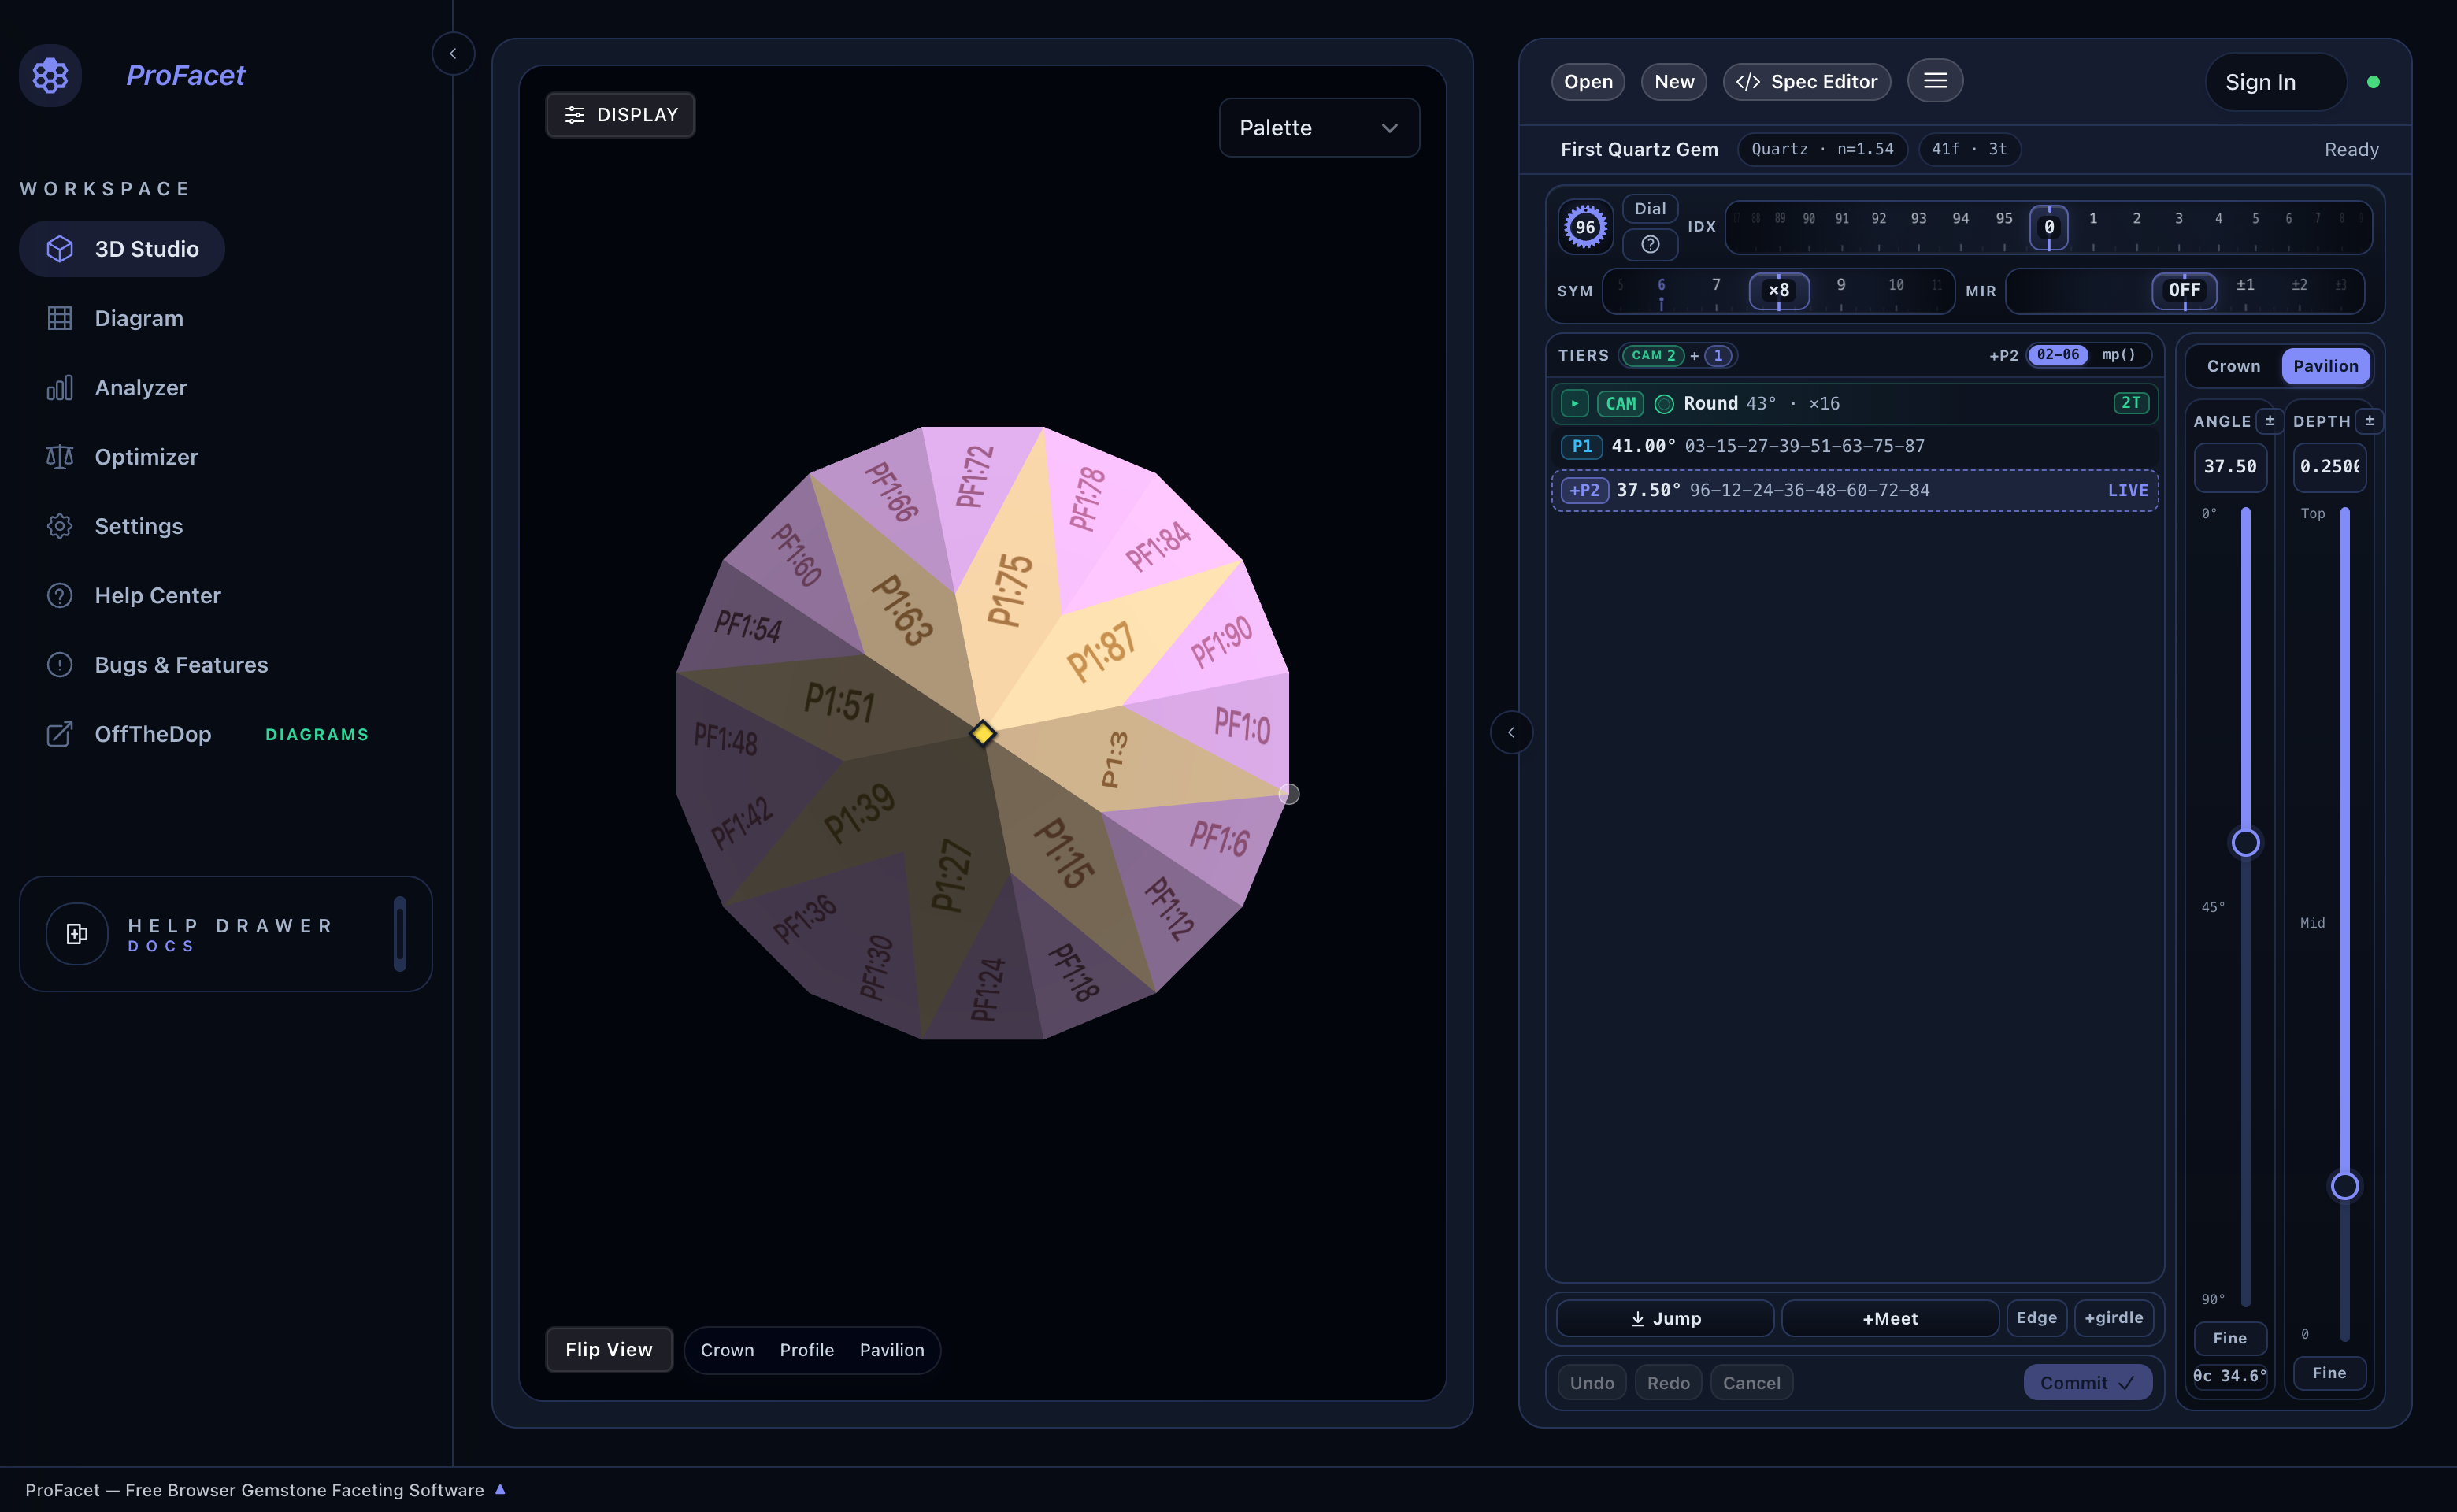
Look at the 3D viewport: your 8 kite-shaped P1 pavilion mains now meet cleanly at the center, while 16 temporary preform triangles (PF1) remain around the outer rim.
Step 3: Cut the 16 Mirrored Pavilion Breaks (P2) Meeting the Girdle (gp())
Next, we cut 16 steeper Pavilion Break facets (P2) at 42.40° to cut away every remaining temporary PF1 preform facet and establish a level, scalloped 16-facet girdle:
- In the Precision Dial Deck, configure a mirrored 8-fold tier centered on the
P1mains (IDX = 3):IDX:3SYM:×8MIR:±3- How this works: At each of the 8 main positions (
03, 15, 27…),MIR ±3cuts two break facets (3 - 3 = 0and3 + 3 = 6, etc.), producing all 16 break facets (96-06-12-18-24-30-36-42-48-54-60-66-72-78-84-90) aligned with the 16 girdle facets!
- Set the vertical
ANGLEmast to42.40(steeper thanP1's41.00°, and slightly shallower thanPF1's43.00°so it slices deeper into the stone from the girdle rim and completely replaces all 16 temporaryPF1facets). - Click
↓ Jumpand then+MeetsoP2locks directly onto the outer girdle points (gp()). - Click
Commit ✓.
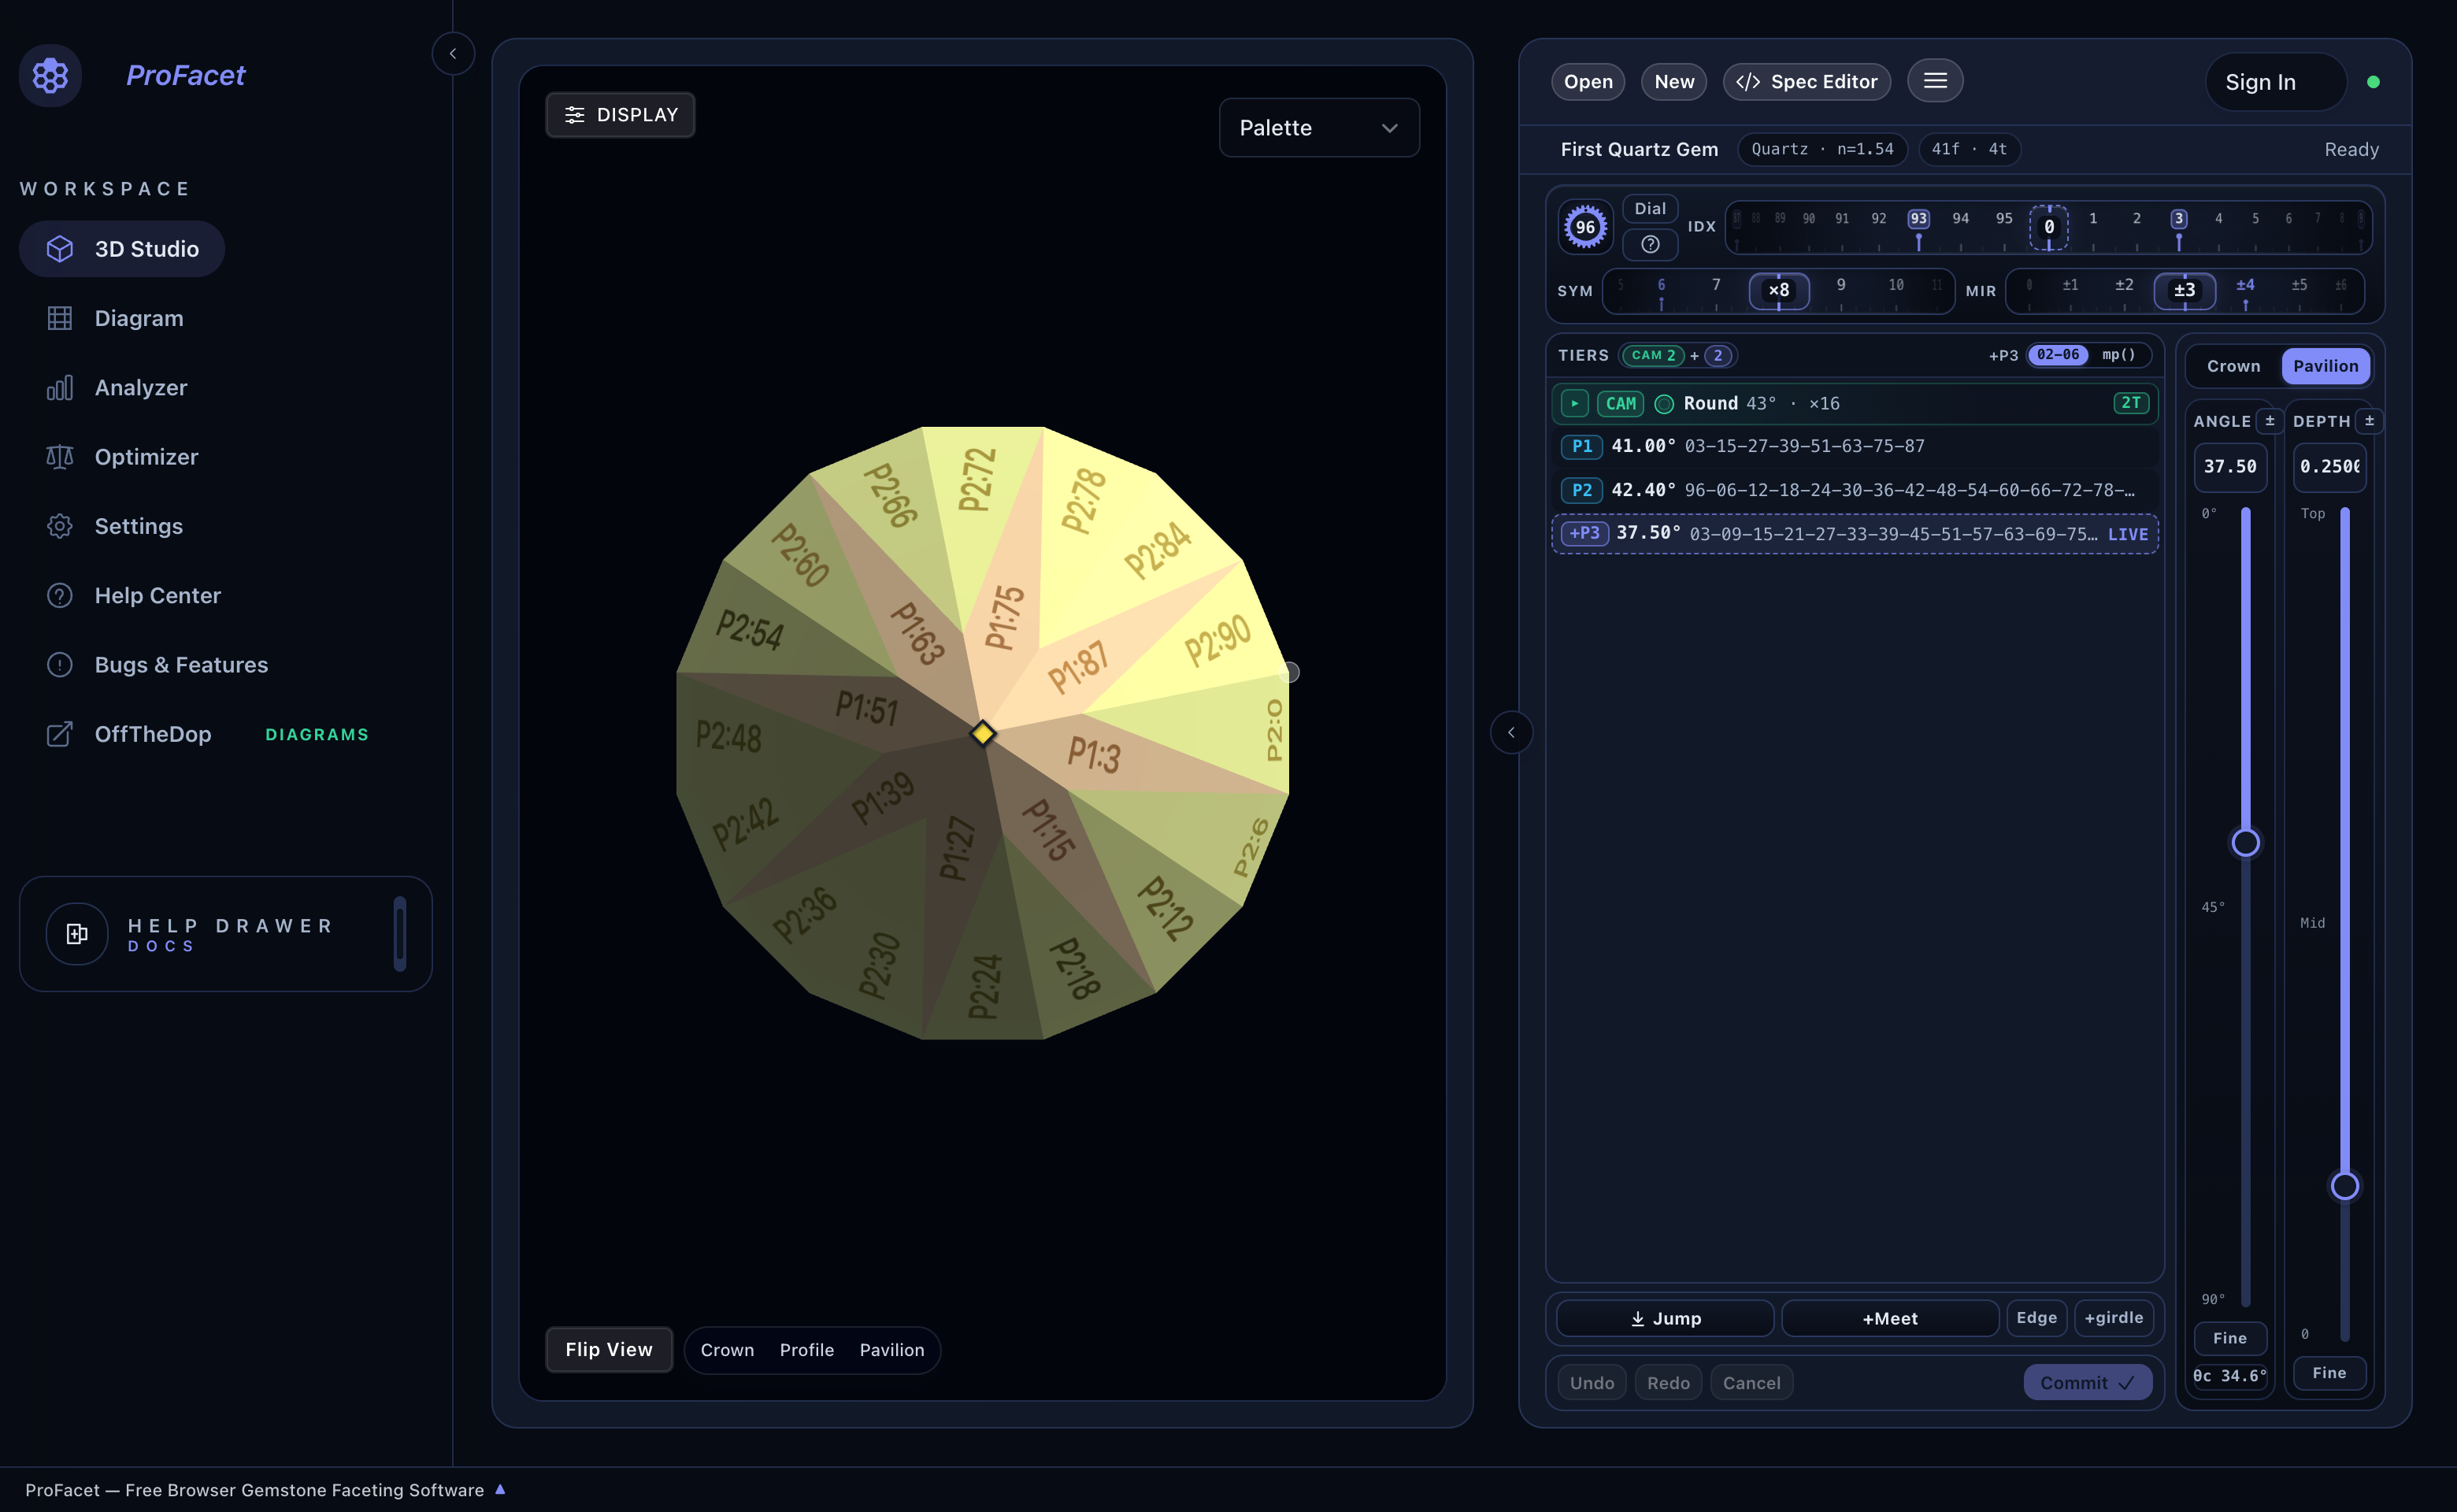
The Pavilion is now 100% finished—every temporary PF1 preform facet has been cleanly cut away, leaving 8 P1 Pavilion Mains framed by 16 P2 Pavilion Breaks!
Step 4: Flip to the Crown & Cut the Crown Breaks (C1) and Mains (C2)
Now let's flip the stone over to cut the upper Crown dome:
- Above the vertical sliders on the right, switch from
PaviliontoCrown. - At the bottom-left of the 3D viewport, click
Crownto look straight down at the top of the stone. - Cut the 16 Crown Breaks (
C1):- Set the drums to
IDX = 3,SYM = ×8,MIR = ±3(matching the 16 Pavilion Break and Girdle facets below). - Set
ANGLEto42.00. - Click the
+girdlebutton in the bottom action bar, then click↓ Jumpand+Meet(gp() + girdle). - Why
+girdle? The very first Crown tier that touches the Pavilion girdle needs+ girdleso ProFacet leaves a clean vertical girdle band (3%of stone width by default) between the Pavilion and Crown instead of pinching the girdle to a knife-edge. - Click
Commit ✓.
- Set the drums to
- Cut the 8 Crown Mains (
C2):- Set the drums to
IDX = 3,SYM = ×8,MIR = OFF(matching the 8 Pavilion Mains at03-15-27-39-51-63-75-87). - Set
ANGLEto35.00. - Click
↓ Jumpand+Meetto lockC2to the girdle corners (gp()). - Click
Commit ✓.
- Set the drums to
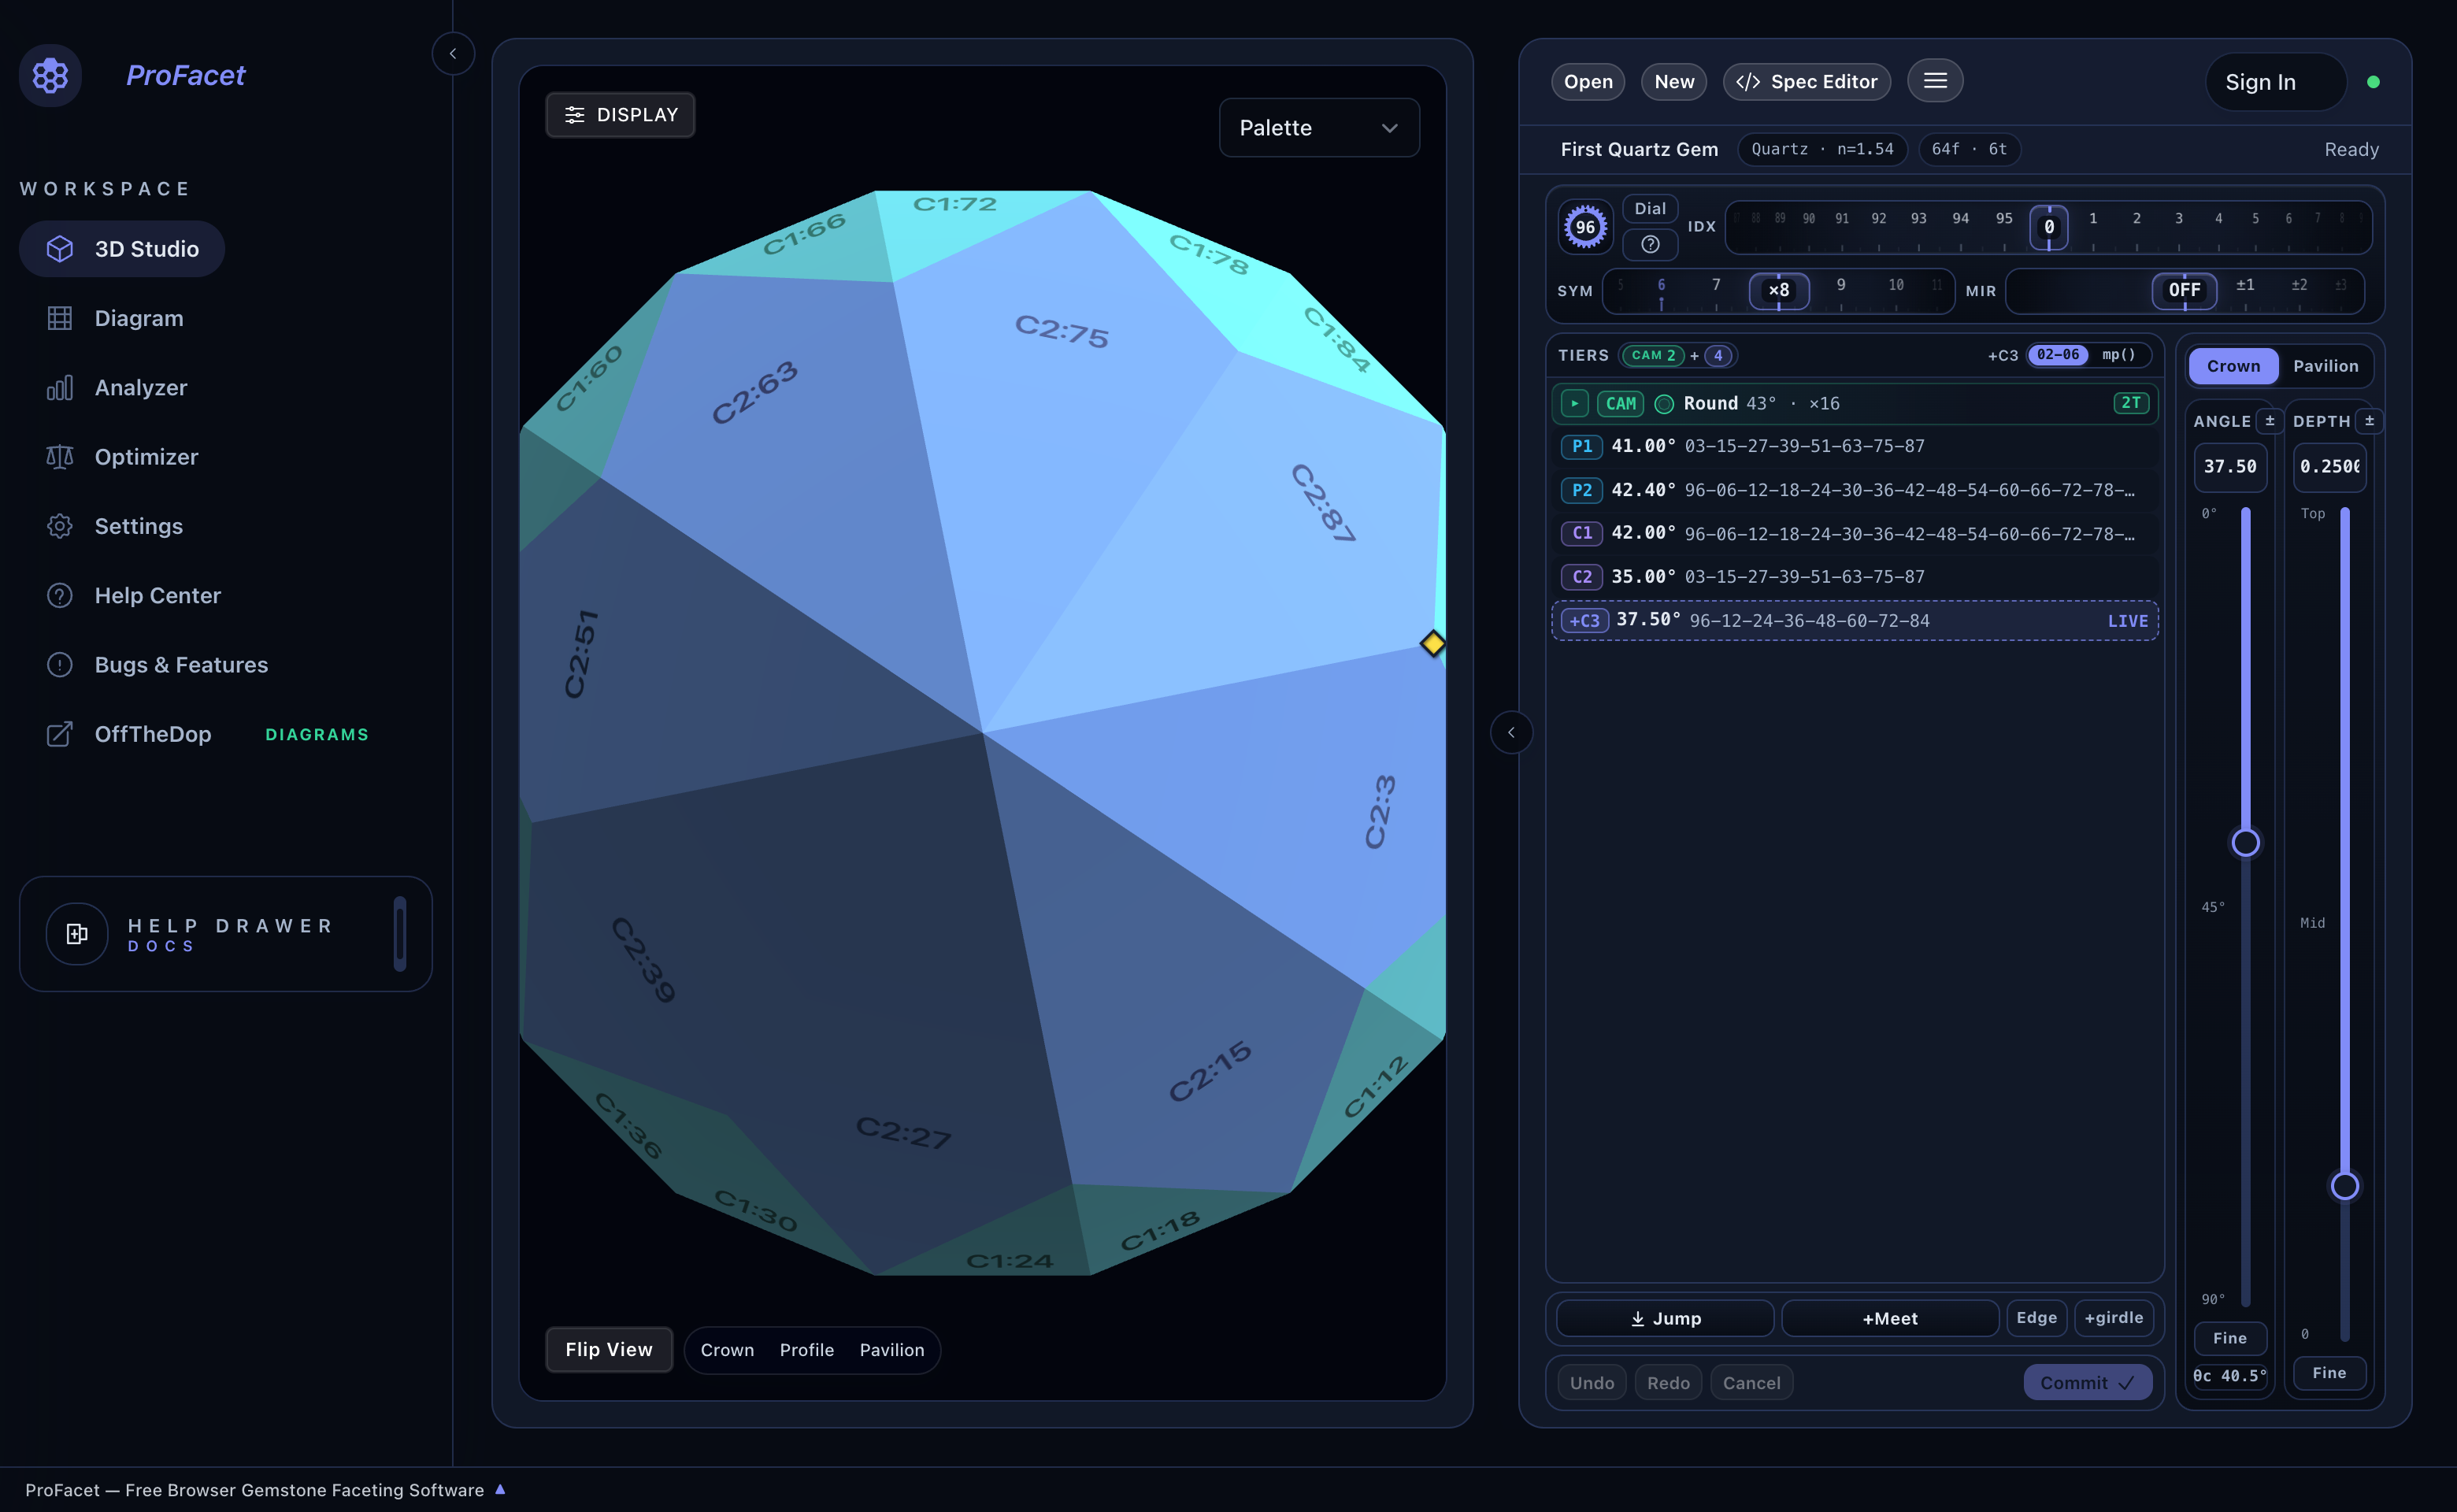
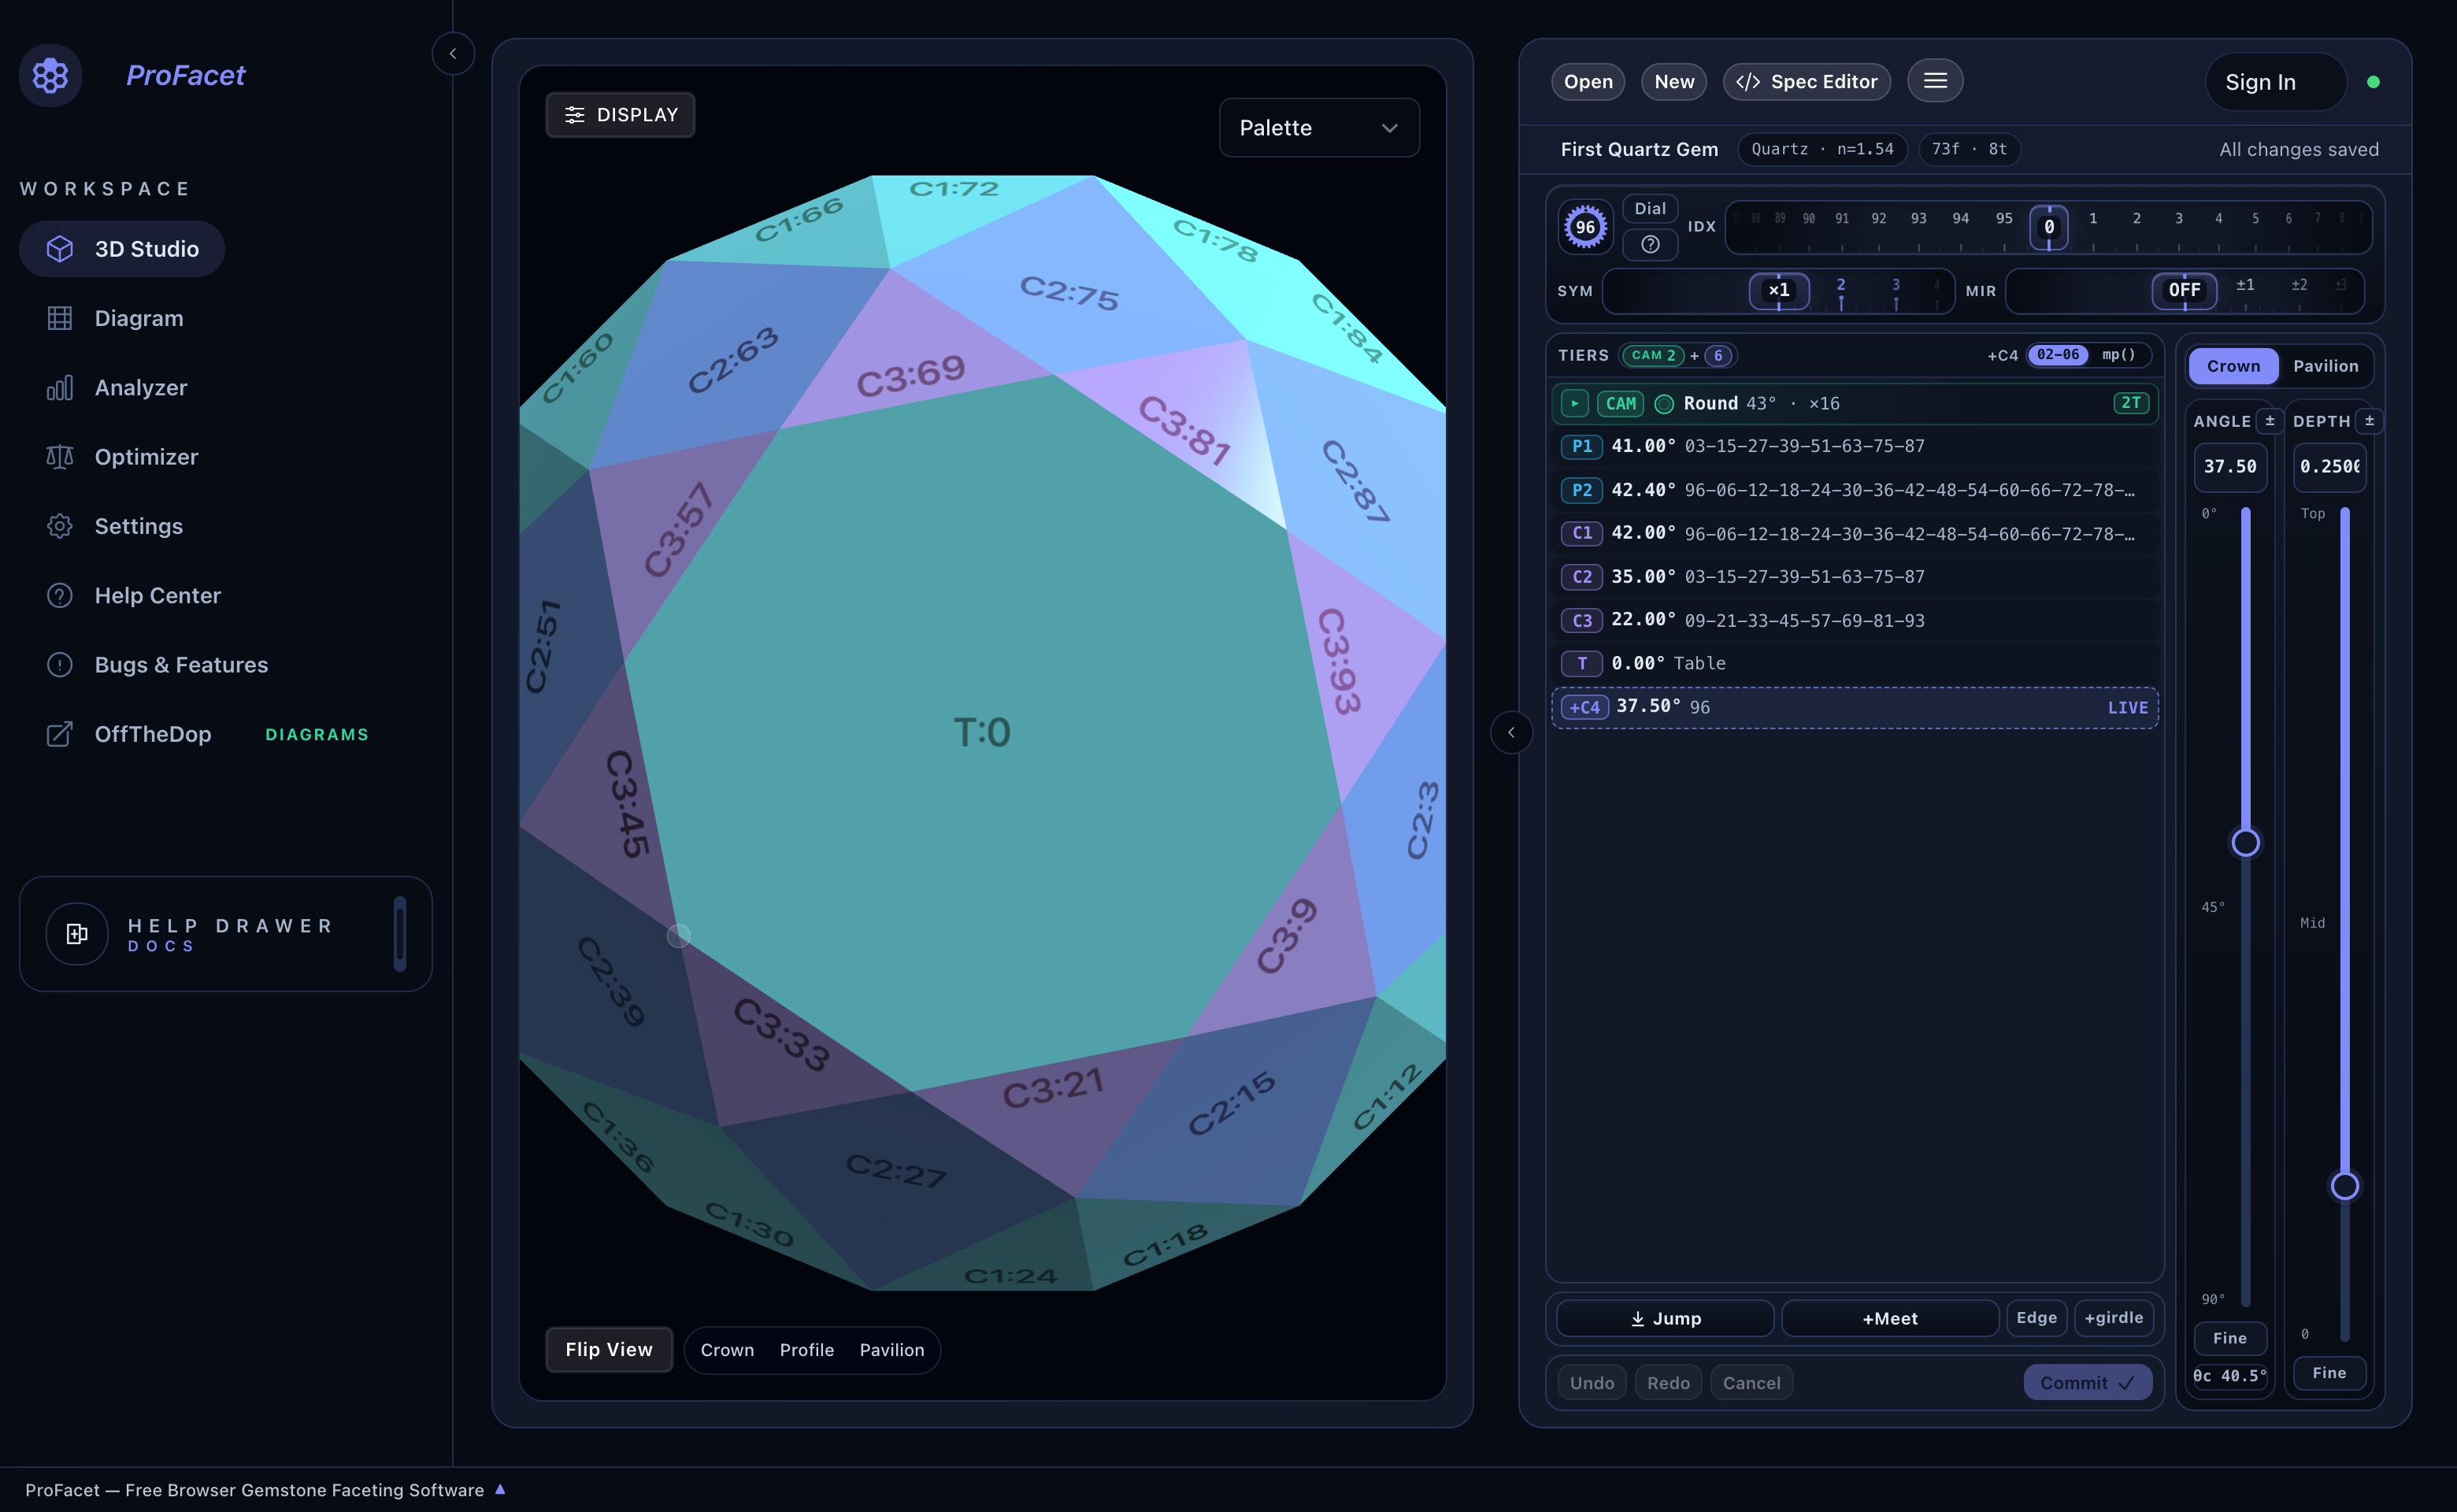
Step 5: Cut the 8 Star Facets (C3) & Polish the Table (T)
Finally, we add the 8 shallow Star facets (C3) and the flat 0.00° Table (T):
- Cut the 8 Star Facets (
C3):- Set
IDX = 9(halfway between the Crown Mains at3and15),SYM = ×8,MIR = OFF. - Set
ANGLEto22.00. - Click
↓ Jumpand+MeetsoC3meets the upper tips of the Crown Breaks (mp(C1)). - Click
Commit ✓.
- Set
- Cut the Flat Table (
T):- Set
IDX = 0,SYM = ×1,MIR = OFF. - Set
ANGLEto0.00. - Click
↓ Jumpand+Meetso the table meets the inner star/bezel tips (mp(C2)). - Click
Commit ✓.
- Set
- Inspect Your Finished 73-Facet Crown in
PaletteMode:- Keep the viewport in
Palettemode withFacet Infoenabled to verify that all 33 crown facets—16C1Crown Breaks, 8 kite-shapedC2Crown Mains, 8 triangularC3Stars, and the central octagonalTTable—meet at razor-sharp vertices. (Whenever you want to preview optical brilliance and spectral dispersion, you can toggle the top-right shading dropdown fromPalettetoRaytracedorBDPT.)
- Keep the viewport in
In Chapter 3: Inside the Interactive Slicer — Dials, Masts & Meetpoints, we will explore every advanced capability of the Slicer, including in-place tier editing, explicit tooth lists, and Edgepoint (Edge) mode.